On this page
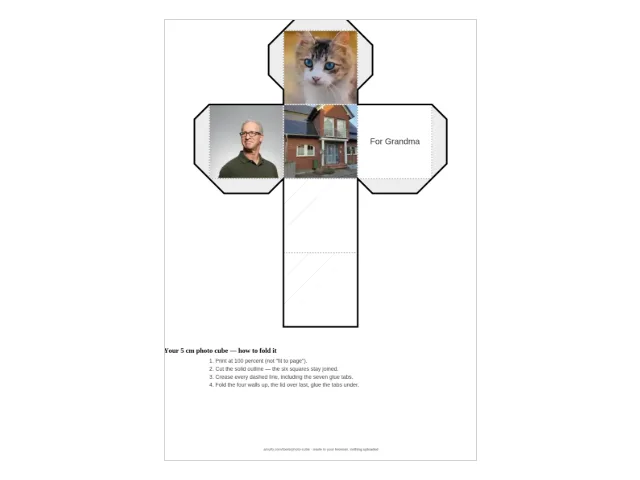
A photo cube is six photos that became one object: print a net, cut it out, fold it, and the pictures stand on a desk as a small paper cube — grandchild on one face, the old dog on another, the house on the third. The tutorials that rank for this craft all stop at the same place: print blank nets, print photos separately, trim each print to a square, glue it on straight. The maker above does that layout job for you — your photos land in their faces, at true size, with the tabs and fold lines drawn in.
How do you make a photo cube out of paper?
- Build the net. Drop in up to six photos (or on the photo cube maker page), pick a face size, and download the PDF. The photos are cover-cropped into their squares — the middle of the picture fills the face.
- Print at 100 percent. In the print dialog, choose “actual size”, never “fit to page” — a shrunken net is the one mistake that cannot be fixed after cutting, because the tabs stop meeting.
- Cut the solid outline in one piece. The six squares stay joined; you are cutting the cross shape loose from the paper.
- Crease every dashed line — the five lines between the squares and the base of each glue tab. Creasing against a ruler edge keeps the walls straight.
- Fold and glue. Fold the four walls up around the centre square, fold the lid over last, and glue the seven tabs underneath. Hold the lid for a count of twenty.
Ten minutes is an honest estimate for the first one; the second takes less, because the folding order is the only trick.
What size should the photos be?
Bigger than you think, but any modern phone is bigger than that. At 300 print DPI a 40 mm face wants about 472 × 472 pixels, a 50 mm face about 591 × 591, and a 60 mm face about 709 × 709 (millimetres ÷ 25.4 × 300, computed October 2026). The maker draws each face at 10 pixels per millimetre, so a phone photo of 1000 pixels on the short side covers every preset without any upscaling — enlarging adds pixels, not detail.
Which photos work best on the six faces?
One subject per face: a head-and-shoulders portrait, a pet looking at the camera, a single house or flower. The crop takes the middle of the photo, so keep the subject near the centre — a wide group shot turns into a crowd of foreheads at cube size. Photos from different decades sit well together on a cube; the small faces read like a shelf of framed prints.
Paper cube, wooden cube or infinity cube?
| Way | What you need | Cost | The photos |
|---|---|---|---|
| Printable net (here) | one sheet, scissors, glue | free | already in the faces, true size, ten minutes |
| Blank net templates (FirstPalette, read 9 October 2026) | template + separate photo prints | free | printed separately, trimmed to squares, glued on by hand |
| Canva template (Etsy, ThePrintcessPress, read 9 October 2026) | the paid template + a Canva account | paid | dragged into frames in Canva, printed from there |
| Wooden block cube (thecountrychiccottage.net) | wooden cube, paint, Mod Podge | craft supplies | prints glued onto wood — permanent, and an afternoon |
| Infinity cube (YouTube/TikTok craft) | 8 small blocks, tape, 10 photos | craft supplies | folds inside-out through the faces — a toy, not a desk object |
The printable net is the only one where the computer does the fitting. If cutting and folding is the fun part for you, the blank nets are honest free craft; if you want the photos already laid out, that is the maker above.
Print tips that decide whether it works
- Actual size, not fit to page — said twice because it is the whole game.
- 160–200 gsm card for a cube that keeps its edges; ordinary paper makes a cube that leans.
- Crease before you fold: run a ruler along every dashed line first, then fold. Straight creases are the difference between a cube and a lump.
- Glue the lid’s tabs last and hold them longest — the lid is the face everyone picks up.
When the cube is done, the same bench builds the rest of the gift: gift tags with a photo inside for the wrapping, a memory game from more of the family’s photos for the grandchildren’s visit, or a whole shelf of ideas on the photo gifts page.
Questions
How do you make a photo cube out of paper?
Print a cube net with your photos already in the six faces — the maker above builds one at true size with cut outline, fold lines and glue tabs. Cut the solid outline in one piece, crease every dashed line, fold the four walls up around the centre square, fold the lid over last, and glue the seven tabs underneath. Ten minutes, one sheet of paper.
Can I make a photo cube with fewer than six photos?
Yes. Drop in as many as you have — the empty faces print with a light hatch so blank reads as deliberate, and the first spare face can carry a typed note instead. Three photos of one person, one per face, still make a proper little cube.
What kind of paper works for a photo cube?
Any A4 or US Letter sheet prints the net, but office paper folds softly. Cardstock at 160–200 gsm keeps the edges crisp and the cube standing; a glue stick or thin craft glue holds the seven tabs, and tape on the inside of the walls works too.
How is this different from the infinity photo cube?
The infinity cube on YouTube and TikTok is a different craft: eight small blocks hinged with tape so the cube turns inside-out through ten photos. It is a lovely toy and it takes an afternoon. The cube here is the quiet version — one printed sheet, ten minutes, and it stands on a desk.
Is the photo cube maker free?
Yes — no account, no watermark, no limit on how many cubes you make. The photos never leave your device: the net is built in your browser and handed to your printer as a PDF.